Board Jumpers & Config
This page details the jumper and configuration settings for the BlueSCSI. Some models, like the Desktop 50-pin, may have additional jumpers not present on other models.
TRM_ON/TRM_OFF
Enables or disables termination. If the BlueSCSI is the last device on the SCSI bus it should be in the TRM_ON position to enable termination.
Initiator/Target
For selecting Initiator/Target mode. Jumper must be installed for desired role, or BlueSCSI will not work.
- Normally set to
Targetunless using Initiator Mode
Note: This setting is only present on Desktop style BlueSCSI hardware, versions 2023.09a and later. It is not present on DB25, PowerBook, or C50.
BOOT/BOOTSEL
Use this button to enter flashing mode. Hold the button and plug in a USB cable from your computer into the USB port. The BlueSCSI will appear as a USB drive on your computer. You can now flash the BlueSCSI by copying or dragging .uf2 files onto this drive. Once a file has been copied the BlueSCSI will automatically eject and restart. You can find these .uf2 files and additional details on the Updating Firmware.
SW1
Reset the SCSI Bus - This is not normally needed by an end user.
PWR_ON
(Desktop design only) Usually a jumper is installed here to allow power to pass from the Berg power connector to the SCSI termination power line into the BlueSCSI. If you are using USB cable to power the BlueSCSI when installed, this jumper can optionally be removed to isolate it from the SCSI bus and Berg power sources. If this jumper is removed the Berg power connector will not power the BlueSCSI.
BACK_FEED
(Desktop design only) If you would like 5v fed back into the SCSI termination power line, install a jumper here. Normally not required.
SDBG
(Desktop design only) Used for serial debugging. Not normally needed, because Developers-(Advanced)#usb-serial-debug is available.
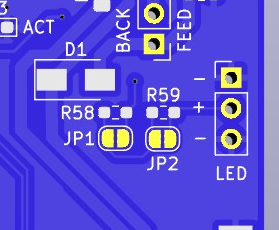
External LED Brightness Adjustment (Desktop Version 2023.03a and later)
To slightly increase the brightness of external LEDs you can bridge solder jumper JP1.
To increase brightness a lot, bridge solder jumper JP2.
Do not bridge both solder jumpers! This will cause LED damage!
S1/S2
Configuration jumpers - Unused and superseded by the Qwiik connector.
This wiki has been updated 1019 times by 106 people like you!
Click here to edit this page.
Generated 2026-07-25